KEH Camera Review: *Pros and Cons* Is It Worth Buying?
Does KEH offer cameras that live up to the hype, or does their pricing beat the used camera gear on the market? KEH is an outstanding online retailer of se...
Most, if not all, of our readers are responsible not only for the data that is housed on servers or passes over networking gear, but are also responsible for the physical security of the gear itself. That security consists of several layers, all of which are setup to prevent malicious access to the network, gear and data which make up our jobs. One layer of security is visual, especially when dealing with remote closets or rooms.
A new generation of IP or network based cameras makes it easier for the IT department to make sure that nobody is entering their closets without permission, or even to assist in making network changes remotely. The Axis 211 Network Camera is a perfect example of that.
Table Of Contents
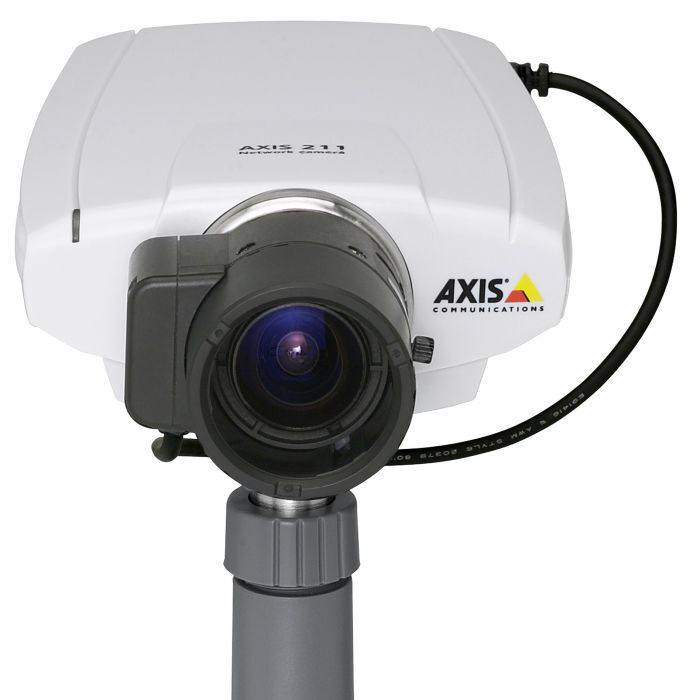
The Axis 211 comes in a nice box, well protected in a plastic bubble inside the cardboard box. It includes a small documenation book explaining how to setup the camera, a CD with installation software, a small adapter for connecting sensors to the camera, a power supply brick and a basic mounting kit with an arm, swivel and screws.
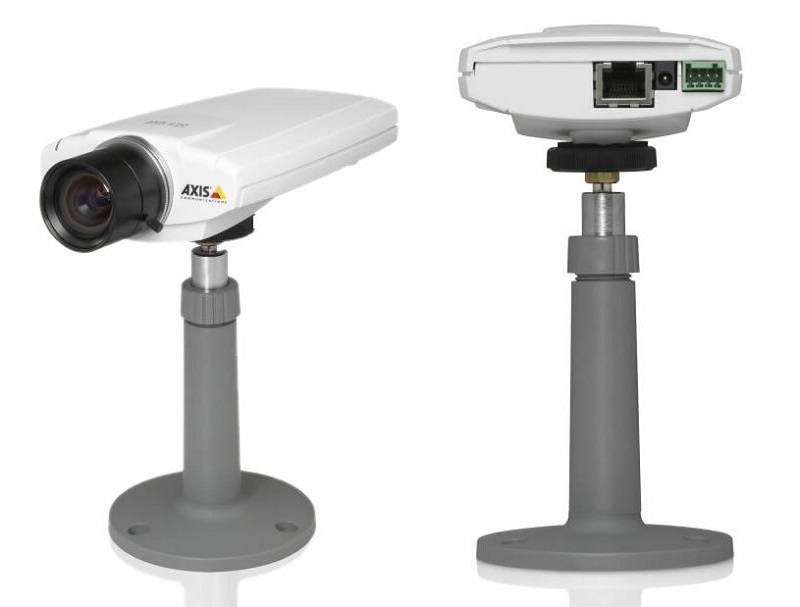
The back of the 211 has the iris control connector, power connector, network port and a four pin connector to allow for open / closed sensors. There is a nice adaptor to go from bare wire to this connector included. These connectors are intended as triggers for the camera. For instance, you can attach a sensor to the door of a cabinet and wire it into the camera, and then use the cabinet door opening as a trigger to start recording video.
There is a wire running from the iris control connector around to the front of the camera. As others have noted, this isn’t the best thing I’ve ever seen, but it’s also not the worst. The camera still functions admirably with the cable disconnected, so worries about people pulling it out and stopping the camera aren’t really an issue.
On the bottom of the camera is the connector for mounting it, and a small reset button. The button is nice in that you have to reconnect to the camera and tell is that it needs to reset in within a minute, or the camera just goes back to it’s stored settings.
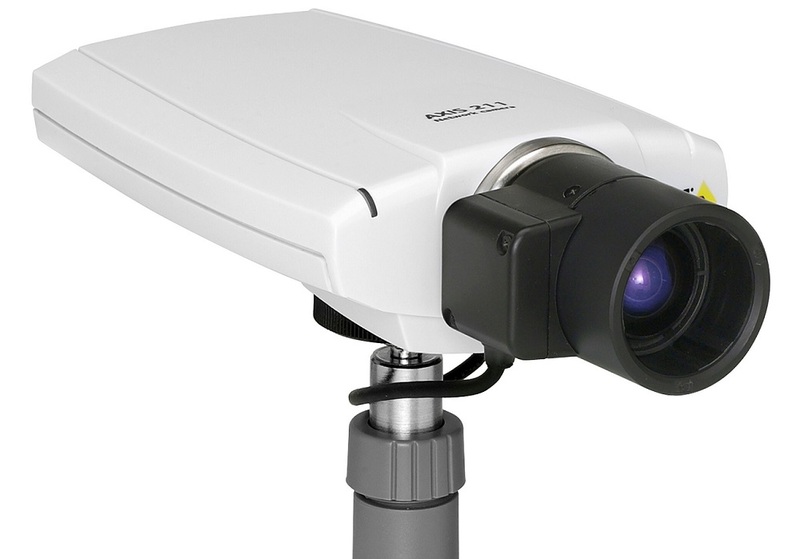
The varifocus lense that is included has adjustment screws on it for width of the image (basically zoom) and for focusing the image once you have the field of view and depth that you need for your application.
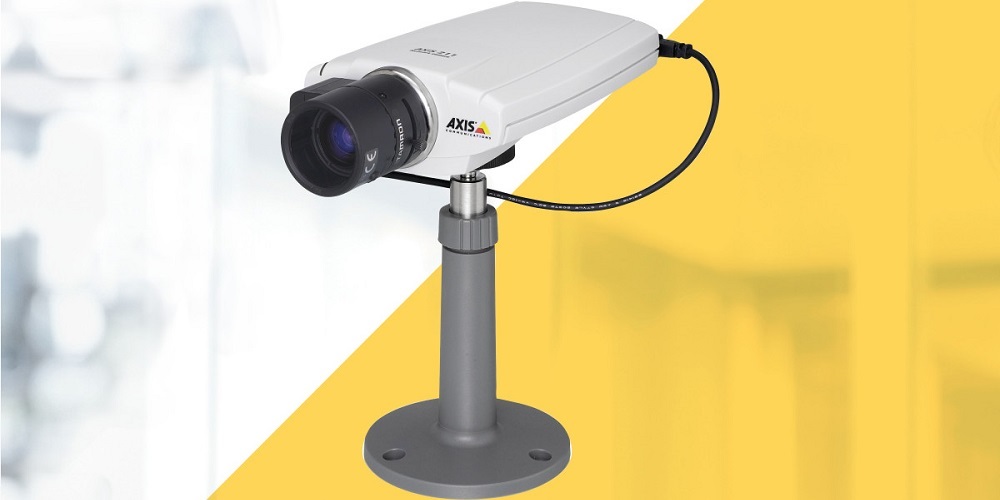
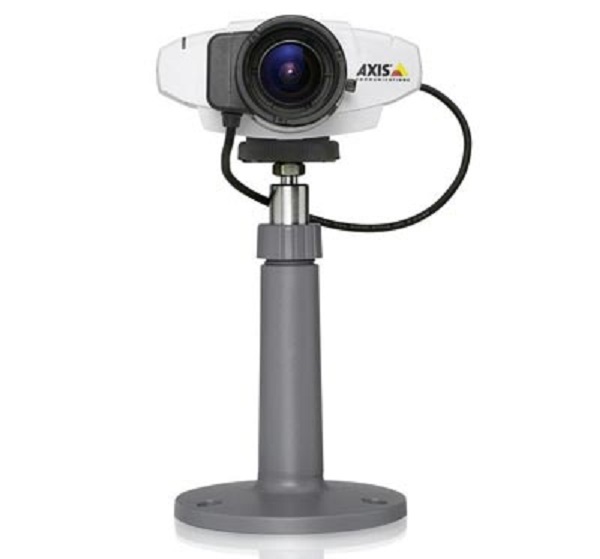
The Axis 211 comes with a basic pedestal mount, which is about 5 inches tall. It has a standard camera attachment point that swivels to almost any position. You can easily mount the camera in any of several positions using the pedestal. We’ve mounted them to both the ceiling and wall, and in one case used cable ties to hold the pedestal to the top of a standard 19 inch rack.
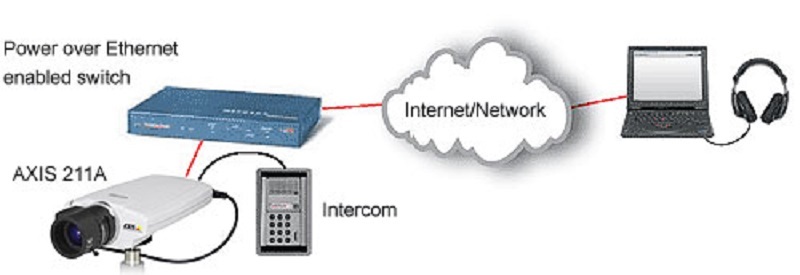
Using POE to power the camera definetely makes it easier to mount, as you only need to connect one cable to the camera. If you are unable to use POE for power, the included power supply has a fairly long cable, about 10 feet, and the wall wart transformer isn’t too large, but it still will take up a couple of places on a power strip.
On the downside, the power supply uses a 90 degree barrel plug, which is a bit awkward to plug into the back of camera. A straight plug would work a bit better. Either way, there is no way to hook the cable itself to the camera, so the only thing holding in the power connector is the friction of the barrel. That really isn’t so bad, but I have a preference for connectors that require more than an accidental bump to knock out. Some type of simple wiretrap or swivel clip for the cable would be nice.
Actual installation only takes a couple of minutes. Basically you need to choose a location for the camera that will provide you with a view to whatever you would like to monitor, screw the pedestal mount to the all, attach the camera, tighten the swivel mount and attach your network cable, or power and network cables.
Once the camera is mounted you’ll still need to be able to access the camera for setting the focus, which is done after the camera is configured.
There are several ways to configure the Axis 211 software. The easiest for me was to use the PING/ARP method to set an address, then connect to that address via the web interface and permanently set the fixed address.
I also tested the Axis quick setup method, in which you push the reset button on the bottom of the camera, give it a few seconds to pick up a DHCP address, then connect to an Axis web site, enter the units MAC address, at which point the Axis website gives you a URL to the camera using the DHCP address it was assigned. You can then connect to the camera and change it’s address to a permanent one. You could always leave the address using DHCP, but in most cases it’s going to be easier to hard set it so you always know where it is.
Once logged in, you are asked to change the root password. After that, there is a basic configuration that you can step through to get up and running. The steps included are setting up users, configuring the cameras tcp/ip settings, setting up the date and time, configuring the video and image options and setting the focus for the camera. At this point, you are either done with all the configuration you need to do, or it’s time to dig a bit deeper into the system.
While there are a ton of configuration options for the video portion of the camera, as you would expect, there are also a serious number of options to configure for other things. Like setting up motion detection, or what to do when there is an alert.
For our use, the most important portions of the system to configure are the montion detection areas of the video, and what happens when something triggers the motion event.
The best order to do this configuration is event servers, where you configure your mail, http or ftp accounts, motion detection, where you configure all the motion detection windows and settings, and finally events, where you use the settings you’ve already configured for motion or event detection and your server settings to create alarms that respond to your predefined inputs.
Here is a quick tour through the configuration screens for the Axis 211 Camera.
After the camera settings are made, you need to focus the camera. You do this by disabling the auto iris in the Video Focus screen. and then watching the picture while adjusting the lens. While this is something that is very simple to do, you may need a couple of people to do it depending on where you mount the camera. One to watch the video for clarity and one to adjust the focus.
I should mention that one of the most difficult things about designing a CCTV system is lens selection. The Axis 211 comes with a varifocus lens that will suffice for most people, but is not optimal for all applications. In order to properaly design and install a CCTV system, you need to be aware of items related to focusing on the area you are trying to monitor, including things such as depth of field.
Remember you need to be able to identify people on your system as well as tell that there is someone there. For every camera and lens setup there will be a "sweet spot" where the focus is absolutely correct to monitor that area. This "sweet spot" is the area you should focus the camera on.
For instance, if you are monitoring a specific rack in your server room, make sure you camera is focused to be able to identify the person in front of that rack, rather than the person coming in the server room door 30 feet behind the rack.
One very nice feature in this release of Axis 211 code is the ability to send emails via authenticated SMTP servers. For some reason most systems that send notification emails still don’t provide an option for authenticating, which in this day and age isn’t a very bright or secure thing to do.
Something that is missing is the ability to send syslog events from the camera. With the ongoing integration of security devices into networks, being able to notify network management systems of events via syslog or SNMP strikes me as an important feature to implement.
We put the Axis 211 camera in place at several locations for testing. The first location was on top of a Chatsworth rack in a server room, looking toward one of the entry doors and covering a single row of racks. The camera was setup to record motion via FTP for any activity around the entry door, and also activity around the KVM of the rack row that is visible.
On motion dection, the camera would FTP 2 seconds of prior footage, then continue to upload images during any motion in the trigger areas, then record an additional 2 seconds of footage. This was a fairly simple configuration, but it did involve 2 motion trigger areas and seperate events for each trigger area.
The second area that we setup a camera was outside the door of the IT department at the same location. This camera was setup to record activity at the door whenever something entered the motion field drawn around the door handle. It was also setup to record pre and post frames to an FTP server, and to continue to record while there was motion in the field.
It was however limited to non-business hour recording. This was a simpler configuration, with only one motion area, but three different recording events: one for 24 hours on the weekends, one for 5 pm to midnight, and one for midnight to 5 am.
In order to monitor the systems, we did a couple of different things. First was to allow anonymous access to the main live viewing page of the cameras. This will allow anyone ot access the live view of the cameras at any time.
The downside to this is that someone can access the camera from different browsers up to the limit of simultaneous users that you have set in the control panel, thus killing your ability to monitor them from here. We then used the code generator in the Axis 211 web interface to generate scripts for each camera that will allow the live view to be seen on a different web server, and created a montage page from one of our monitoring servers.
This gave us a view of both cameras on a small web page that anyone can leave up on their desktop. This also has a downside. System CPU usage goes up significantly processing the motion jpeg inputs into a constant stream of images. Not a big deal on a powerful system, but you do need to be aware that you are using up CPU cycles while watching the live feeds. Keep that in mind if you are building a home made security system here.
The cameras do operate with 2 options for video viewing, mjpeg (which we mostly used) and mpeg4 streaming. The mpeg4 options can use multicast. I personally prefer motion jpeg, as it let’s me know for sure what the most traffic I’m going to have on my network will be, but there is a growing trend towards mpeg4, so I’m glad to see that Axis is making both available.
As for how the cameras did in production, they both operated very well. Once the focus was adjusted correctly, the images where sharp and clear, the motion sensing and file transfers worked very well, and overall the systems performed much as Axis said they would.
We did try the cameras with several IP CCTV software apps, where the camera is controlled via a different application that basically watches the live video, either via mjpeg or mpeg4, and does it’s own motion analysis and recording. All of the commercial packages that we tried worked very well. The Axis 211 is a nice camera for use in IP CCTV deployments, especially where you have a POE enabled infrastructure that the cameras can take advantage of it.
We also tried the cameras with Zoneminder, the open source camera recording and security system. While the Zoneminder system works very well, for some reason it was causing these cameras to hang. They pretty much stopped responding until the Zoneminder system was turned off. I’ve used the Zoneminder system before with other IP cameras, and this is the only one that has exhibited this tendancy.
I was also disappointed that the system didn’t use secure FTP to transfer images, especially as the system has a secure FTP app installed on it. It’s just not available to use via the web interface. And for some reason SNMP isn’t available on the Axis 211, but it is on the Axis 211A, which is the same camera with the addition of two way audio support.
The Axis 211 Camera with POE support is a great camera for monitoring server rooms, closets and as part of an IP CCTV solution. Standalone it provides enough features to make a valuable addition to your security systems, and working in conjunction with IP CCTV software it becomes a star performer for converged network monitoring.
All in all, we give the Axis 211 a good rating, based on it’s overall performance. With a couple changes made to make it’s connectivity more secure, it would easily be as good as any non-megapixel camera out there.