How to Enter BIOS on ASUS Motherboard
Regardless of the operating system you select, for instance, Windows or Linux, you need to be aware that the BIOS (Basic Input / Output System) of your compu...
![How to Update BIOS on ASUS Motherboard [4 Easy Methods]](https://www.cherrypicksreviews.com/rails/active_storage/representations/redirect/eyJfcmFpbHMiOnsibWVzc2FnZSI6IkJBaHBBdEl3IiwiZXhwIjpudWxsLCJwdXIiOiJibG9iX2lkIn19--3d7b20b4bb6fea17da7381842b834672625eda96/eyJfcmFpbHMiOnsibWVzc2FnZSI6IkJBaDdCem9MWm05eWJXRjBTU0lJYW5CbkJqb0dSVlE2QzNKbGMybDZaVWtpRHpFMk1EQjRNVFl3TUQ0R093WlUiLCJleHAiOm51bGwsInB1ciI6InZhcmlhdGlvbiJ9fQ==--699e5720485a4f624b8bb944ad7e9655d2fa9408/update%20bios%20on%20ASUS%20motherboard.jpg)
The BIOS (Basic Input/Output System) on an ASUS motherboard might occasionally need to be updated. Improved performance, compatibility, and stability are just a few advantages of updating the BIOS. In this article, we will walk you through the step-by-step process of updating the BIOS on your ASUS motherboard. However, before we do that, let's take a moment to discuss what BIOS is.
Table Of Contents
The basic Input/Output System, or BIOS for short, is the first firmware that is pre-installed and is kept in a ROM chip on the PC motherboard. The BIOS is primarily in charge of initializing hardware at PC boot-up and supplying operating systems and applications with runtime services.
It's crucial to determine whether a BIOS update is necessary for your ASUS motherboard. You should download the suitable file only after that.
You may need to copy it to a disk in certain situations. And remember, as I mentioned previously, to take safety measures before beginning the process. Let's quickly go over each of these.
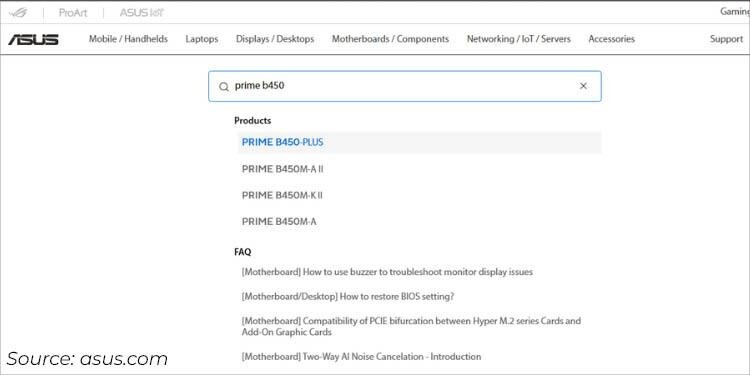
Step 1: Find and pick the motherboard model you own by searching for it on the ASUS homepage.
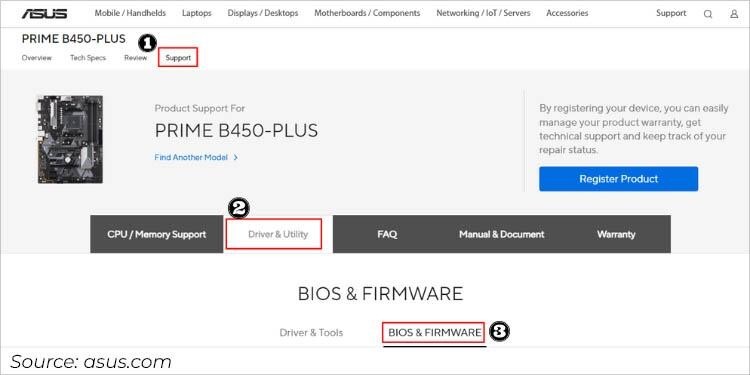
Step 2: Navigate to the Support area.
Step 3: Select BIOS & FIRMWARE under Driver & Utility.
Step 4: The most recent BIOS file will be displayed first. Click Expand All to read a summary of all the remaining variants quickly.
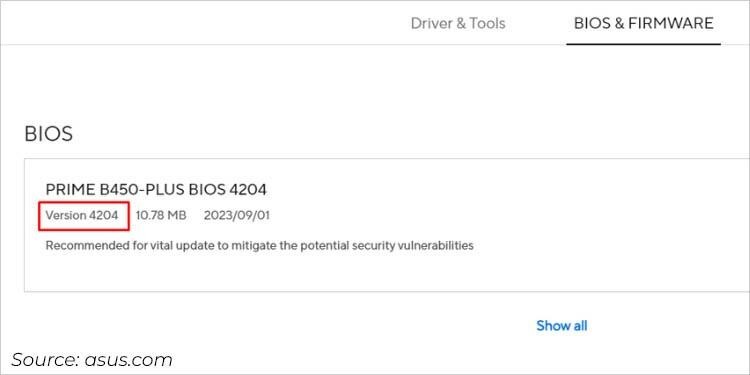
Step 5: Check the current BIOS version on your motherboard by comparing it with the Version field.
You ought to save these improvements for dire emergencies. Here is what to do if you are entirely prepared for a firmware update and have a particular reason:
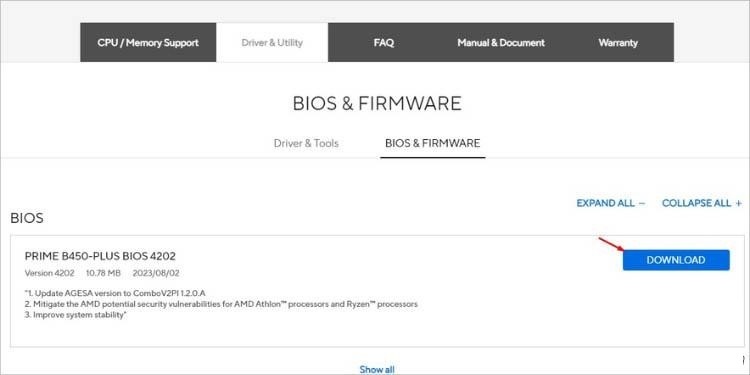
Note: The most recent version, as previously demonstrated, is the one to use. But I advise ignoring the one marked as "beta" because the manufacturer hasn't adequately tested it.
1. After clicking the "Download" button, your computer should save the zip file.
2. Take out what is within it. The two files you will find are BIOS Renamer and the. CAP file. You should know that these two are what makes ASUS unique.
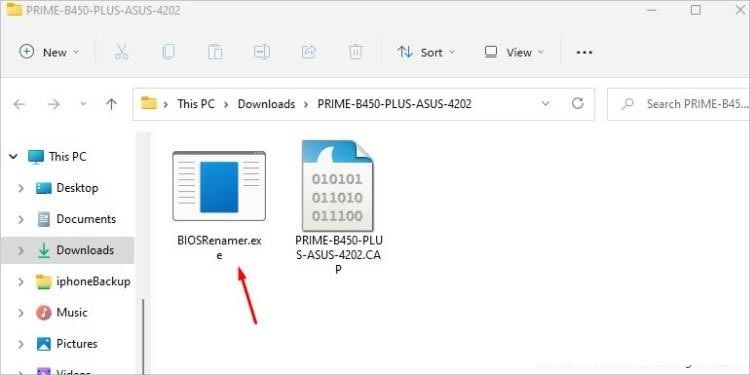
3. Your BIOS file ought to be automatically renamed after running the Renamer file.

You can proceed if you intend to use AI Suite 3's EZ Update application.
Nevertheless, users must copy the file to a drive that is formatted in FAT32 if they are attempting to update via EZ Flash Utility (using the Storage option). Remember that the firmware interface does not support the NTFS or exFAT file systems.
Note: Even though it's recommended to use the most recent BIOS version, some systems could not work properly without an earlier upgrade. Please look over the description for any such exceptions. To ensure the system is reliable, ASUS also suggests loading the optimized defaults following the Update.
You can upgrade your ASUS BIOS in Windows 10 by following the instructions provided below.
The BIOS update tool is available for download from the ASUS support website or MyASUS. Now, let us check the steps to download the update utility from the MyASUS and ASUS support websites, respectively.
A. Steps on how to download the update utility from MyASUS
Step 1: Press Win + S and key in "MyASUS" into the search box.
Step 2: Click on the Enter button to open the window of MyASUS.
Step 3: Select Customer Support > Live Update > Latest. Your machine does not support this function if you cannot locate the Live Update tab. Therefore, please try the second approach.
Step 4: To obtain the ASUS BIOS Installer, you should first locate the BIOS Update (Windows) section, then the next step is to find the BIOS Update for Windows file, and then, finally, you click the download icon.
B. Steps on how to download the update utility from the ASUS support website
Step 1: Go to the official ASUS support website.
Step 2: Key in the model name of your computer into the search bar. (Be careful not to include ASUS; the name should be 4~5 letters and numbers.)
Step 3: On the support page, you should be able to locate the BIOS Update (Windows).
Step 4: Look for the BIOS Installer for Windows file and click the DOWNLOAD button.
Step 5: If you cannot access the BIOS installer, you can also seek the BIOS-Utilities area and download the Windows BIOS Flash Utility (WinFlash).
Note: Please use the below method if you cannot select between the Windows BIOS Update and Windows BIOS Installer.
Two methods are available for updating the BIOS: using the BIOS installer and WinFlash. Further details regarding these two approaches are provided below.
A. Update BIOS with the BIOS Installer
Step 1: Locate and right-click the BIOS Installer file.
Step 2: From the context menu, choose Extract All. Then, click Browse to choose a location.
Step 3: Click the Extract button, and then wait.
Step 4: Double-click the BIOS Update (or BIOS Installer) application file after you have arrived at the destination.
Step 5: The setup wizard will appear: click Next > check I accept the agreement and click Next > click Next > click Install > check Yes, restart the computer now, and then click Finish.
Step 6: Finally, you must wait for the BIOS update process to finish.
B. Update BIOS with the WinFlash
Step 1: First, you must find the WinFlash file on your computer and right-click it.
Step 2: Select Extract All, specify a destination, and click on Extract.
Step 3: Once the extraction process is finished, kindly proceed to the destination.
Step 4: To view the WinFlash setup wizard, double-click the Setup file.
Step 5: Follow the instructions that are present on the "on-screen" to install WinFlash properly.
Step 6: Double-click the application file for WinFlash.
Step 7: Click Next in the WinFlash application to continue to the next step.
Step 8: Select either Get BIOS from Device or Get BIOS from the Web, and hence you click on Update.
Step 9: When you click the Exit button, the update process will restart on your computer automatically.
This section explains how to update your ASUS BIOS using the USB drive and ASUS EZ Flash. It would be best to store the BIOS file on a USB device.
Here, we can download the BIOS file using two methods. The first method is to download the BIOS file from MyASUS, while the second is to download the BIOS file from the ASUS support website. Further explanations are below.
A. Steps on how to download the BIOS file from MyASUS
Step 1: Search MyASUS by using the Windows search feature.
Step 2: Go to Customer Support > Live Update > Latest.
Step 3: Look for BIOS version BIOS or ASUS EZ Flash Utility under the BIOS section.
Step 4: Click on the download icon and wait.
B. Steps on how to download the BIOS file from the ASUS support website
Step 1: Visit the ASUS support website.
Step 2: Key in the computer's model name > click Driver & Utility > shift to BIOS & FIRMWARE.
Step 3: Search for the BIOS for the ASUS EZ Flash Utility file or the BIOS version file under BIOS on the support page.
Step 4: Click DOWNLOAD, and hence, you save the file on your USB drive.
Here, you can update BIOS in two different modes. These two are updating BIOS ASUS in UEFI mode and updating BIOS ASUS in Legacy Mode.
A. Updating BIOS ASUS in UEFI Mode
Step 1: After inserting the USB drive, extract the downloaded BIOS file.
Step 2: To access the BIOS Utility, restart your ASUS computer and press the DEL key.
Step 3: Click Advanced Mode and shift to the Tool tab.
Step 4: Select ASUS EZ Flash 3 Utility on this interface.
Step 5: Select the drive containing the BIOS file, and then select the file.
Step 6: Select "Yes" in the popup box.
Step 7: To update and verify the BIOS data, click "Yes" again.
Await the completion of the process. Your computer will then restart itself on its own.
B. Updating BIOS ASUS in Legacy Mode
Step 1: After inserting the USB drive, extract the BIOS file.
Step 2: Restart your PC to enter the BIOS Utility.
Step 3: Shift to the Advanced tab.
Step 4: Navigate to ASUS EZ Flash 3 Utility and press the Enter button.
Step 5: After deciding on the destination storage device, pick the BIOS file.
Step 6: Navigate to Yes, followed by pressing the Enter button to continue.
Your computer will automatically reboot after the BIOS upgrade is complete.
Step 1: Using the procedures in Method 2 above, you can obtain the BIOS file.
Step 2: Extract the file to your USB.
Step 3: Download and then install AI suite3.
Visit the ASUS Download Center > enter the model name > click Driver & Utility > select Drivers and Tools > select the operating system > look for the AI Suite 3 file under Software and Utility > click DOWNLOAD.
Step 4: You should then be able to extract the AI Suite 3 file to your USB drive.
Step 5: Find and double-click on the AsusSetup.exe file, then click Install to install AI Suite 3.
Step 6: After restarting the computer, run the EZ Update to update the BIOS.
Click on the Start icon > select EZ update from the left pane > click on the three dots icon under manually update boot logo or BIOS > select the extracted BIOS file > click Update > click Flash > click OK > restart the ASUS computer > the EZ Flash interface appears > wait for the Update to complete > restart the computer again.
Updates can be made using a specific method called USB BIOS FlashBack, found under the Shutdown or Uninstall CPU Status menu.
This technique is limited to specific ASUS computer models. Please visit this ASUS support page to learn more about whether your motherboard is compatible with the USB BIOS FlashBack feature and how to utilize BIOS FlashBack in detail.
When attempting to upgrade BIOS using the previously mentioned techniques, use caution. Your computer can have trouble booting up if, regrettably, the BIOS upgrade was unsuccessful. Please recover your files from this problematic PC if your computer cannot start up regularly. In this situation, you should seek assistance from outside data recovery programs.
As the most excellent free data recovery program, MiniTool Power Data Recovery can recover files from various data storage devices, such as unbootable computers, inaccessible SD cards, and formatted USB flash drives. Furthermore, this software can retrieve many files, including images, archives, files, movies, and more.
Below, we have carefully explained how files can be recovered from both bootable and unbootable ASUS computers, so be very careful not to mess up.
A USB flash drive (with a capacity of 4GB to 64GB) and a high-performing computer are required if you wish to utilize MiniTool Power Data Recovery to recover crucial files from an unreliable machine. Then, MiniTool Power Data Recovery's snap-in WinPE Bootable Builder allows you to make a bootable disk. Next, recover files from the unbootable PC using this bootable disk that was made. Proceed to read the steps in detail.
Part 1: Create a Bootable Media
Follow the steps below so that you can be able to create a bootable media.
Step 1: On a powerful computer, download and install MiniTool Power Data Recovery.
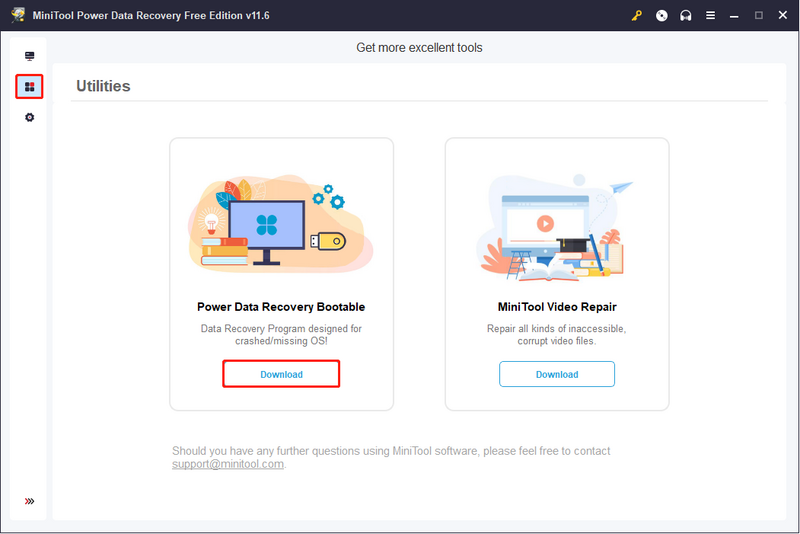
Step 2: After starting the program, select the Utilities option from the sidebar on the left.
Step 3: Under "Power Data Recovery Bootable," you must select the "Download" option. At the back of your mind, you need to be aware that updates to the edition are required. Then, you need to choose an advanced edition carefully. Note that the WinPE Bootable Media Builder snap-in must be present in your chosen one.
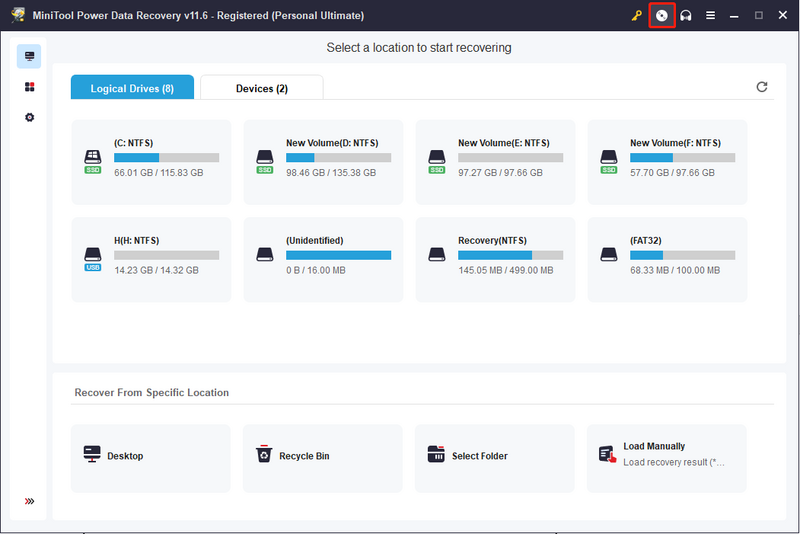
Step 4: Return to the This PC interface, choose the key icon, and enter your registry key. Following the software update, you will receive an email containing the registry key.
Step 5: After the USB drive has been ready, connect it to the computer and select Refresh.
Step 6: To launch MiniTool Media Builder, select Bootable Media in the upper right corner.
Step 7: Follow the instructions of the on-screen carefully to create a bootable media.
Step 8: Upon completion of the file preparation procedure, click Finish.
Part 2: Recover Data from an Unbootable Computer
Step 1: Connect the USB drive to the faulty PC.
Step 2: To access the BIOS menu, restart your computer and press and hold F2.
Step 3: Modify the boot order such that the produced bootable disk is the first to boot your machine.
Step 4: To save the modification and exit the BIOS menu, click F10 and press Enter.
Step 5: The window for MiniTool PE Loader will appear on your screen immediately after the computer restarts. Hold on a moment or two. That will trigger the automated launch of MiniTool Power Data Recovery.
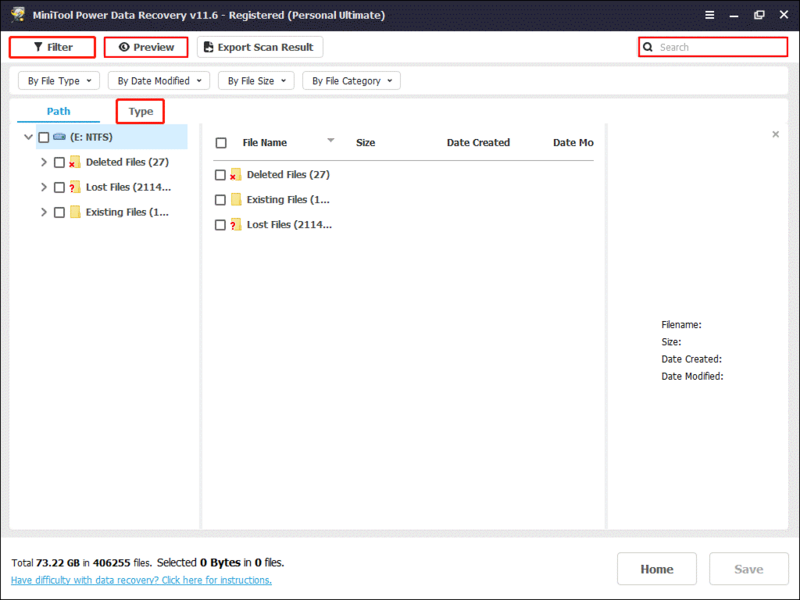
Step 6: After selecting the partition from which you need to recover files, press the Scan button.

Step 7: You need to wait for the completion of the process. To locate the desired files, look through the results page. You can utilize the Filter, Type, and Search features to narrow down the desired files because there may be many of them. Next, verify that the selected file has been corrected using the Preview feature.
Step 8: After ensuring all the files you wanted are there, click Save.
Step 9: After selecting the appropriate path to save the files, click OK to finish.
You can verify if your files have been deleted if the BIOS upgrade is successful. If so, the MiniTool Power Data Recovery application is another tool to recover lost files. You can recover up to 1GB of files with the free edition by doing a thorough drive scan. You can locate an appropriate advanced edition by visiting this website if you would rather have a large recovery capacity. It is strongly advised that personal users utilize the Personal Ultimate edition.
An ASUS motherboard's BIOS may be updated quite quickly, but it is crucial to carefully follow the directions and make sure you have the right BIOS file. It is always advised to get expert help or speak with ASUS support if you feel uneasy or hesitant about updating the device on your own.